
Rimo in Claude
Connect Rimo to Claude and ask about your meeting notes right inside the chat. Claude looks things up in Rimo and answers:
- "What did we decide in Monday's call, according to my Rimo notes?"
- "Summarise last week's client meeting from Rimo."
Rimo Voice is listed in Claude's connector directory: find it in Claude, click Connect, sign in with your usual Rimo account in your browser, and you're done.
Open the link below to land straight on Rimo Voice with its Connect button:
https://claude.ai/directory/connectors/rimo-voiceThe steps below are the same on claude.ai in the browser and in the Claude desktop app — the connector belongs to your Claude account, so you set it up once and it works in both.
Using ChatGPT, Gemini, or Microsoft Copilot instead? See Rimo in ChatGPT, Rimo in Gemini, or Rimo in Microsoft Copilot. On your own machine with a coding tool (Claude Code, Cursor, Codex)? See Rimo in Coding Tools.
Before you start
- A Rimo account — the same one you normally sign in with.
- A Claude account. Connectors from the directory are available on Claude's Free, Pro, Max, Team, and Enterprise plans:
- Free / Pro / Max — connect it yourself.
- Team / Enterprise — an admin enables Rimo Voice for the organization; each member then clicks Connect.
You never type a Rimo password or key into Claude. You sign in on Rimo's own page, in your browser.
Connect Rimo Voice
If you're on Claude's Free, Pro, or Max plan
Shortcut: opening claude.ai/directory/connectors/rimo-voice takes you straight to the listing in step 4 — skip steps 1–3.
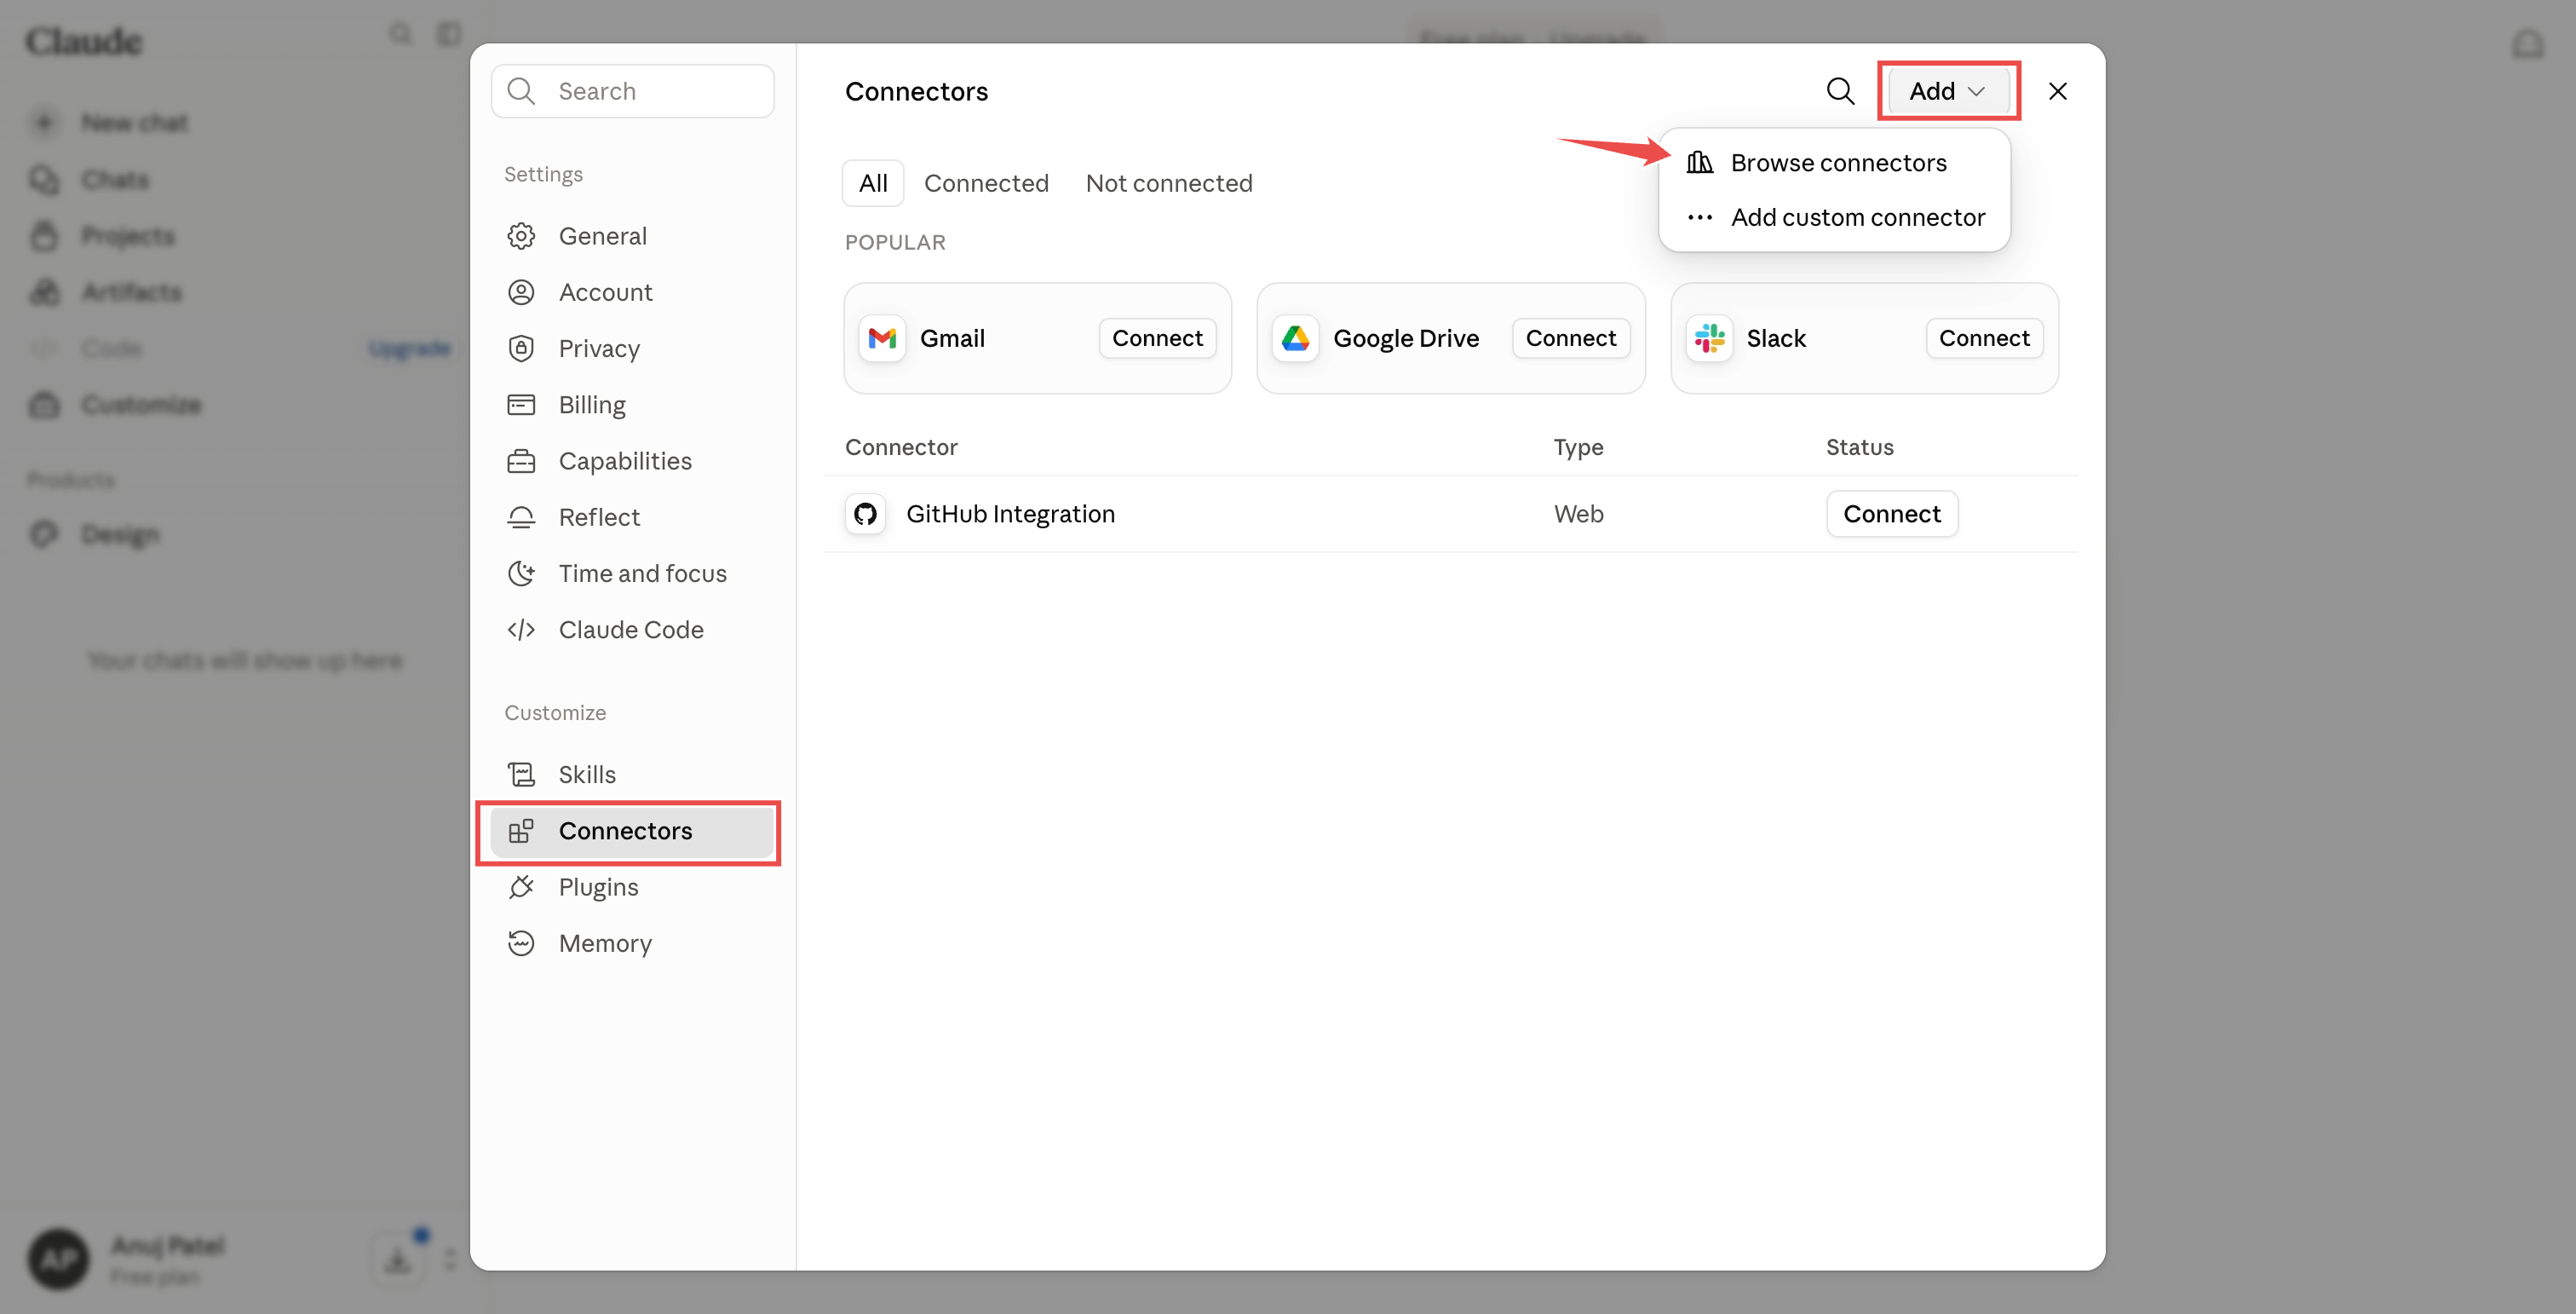
Open Customize → Connectors in Claude.
Click the Add button (top right of the Connectors page), then choose Browse connectors.
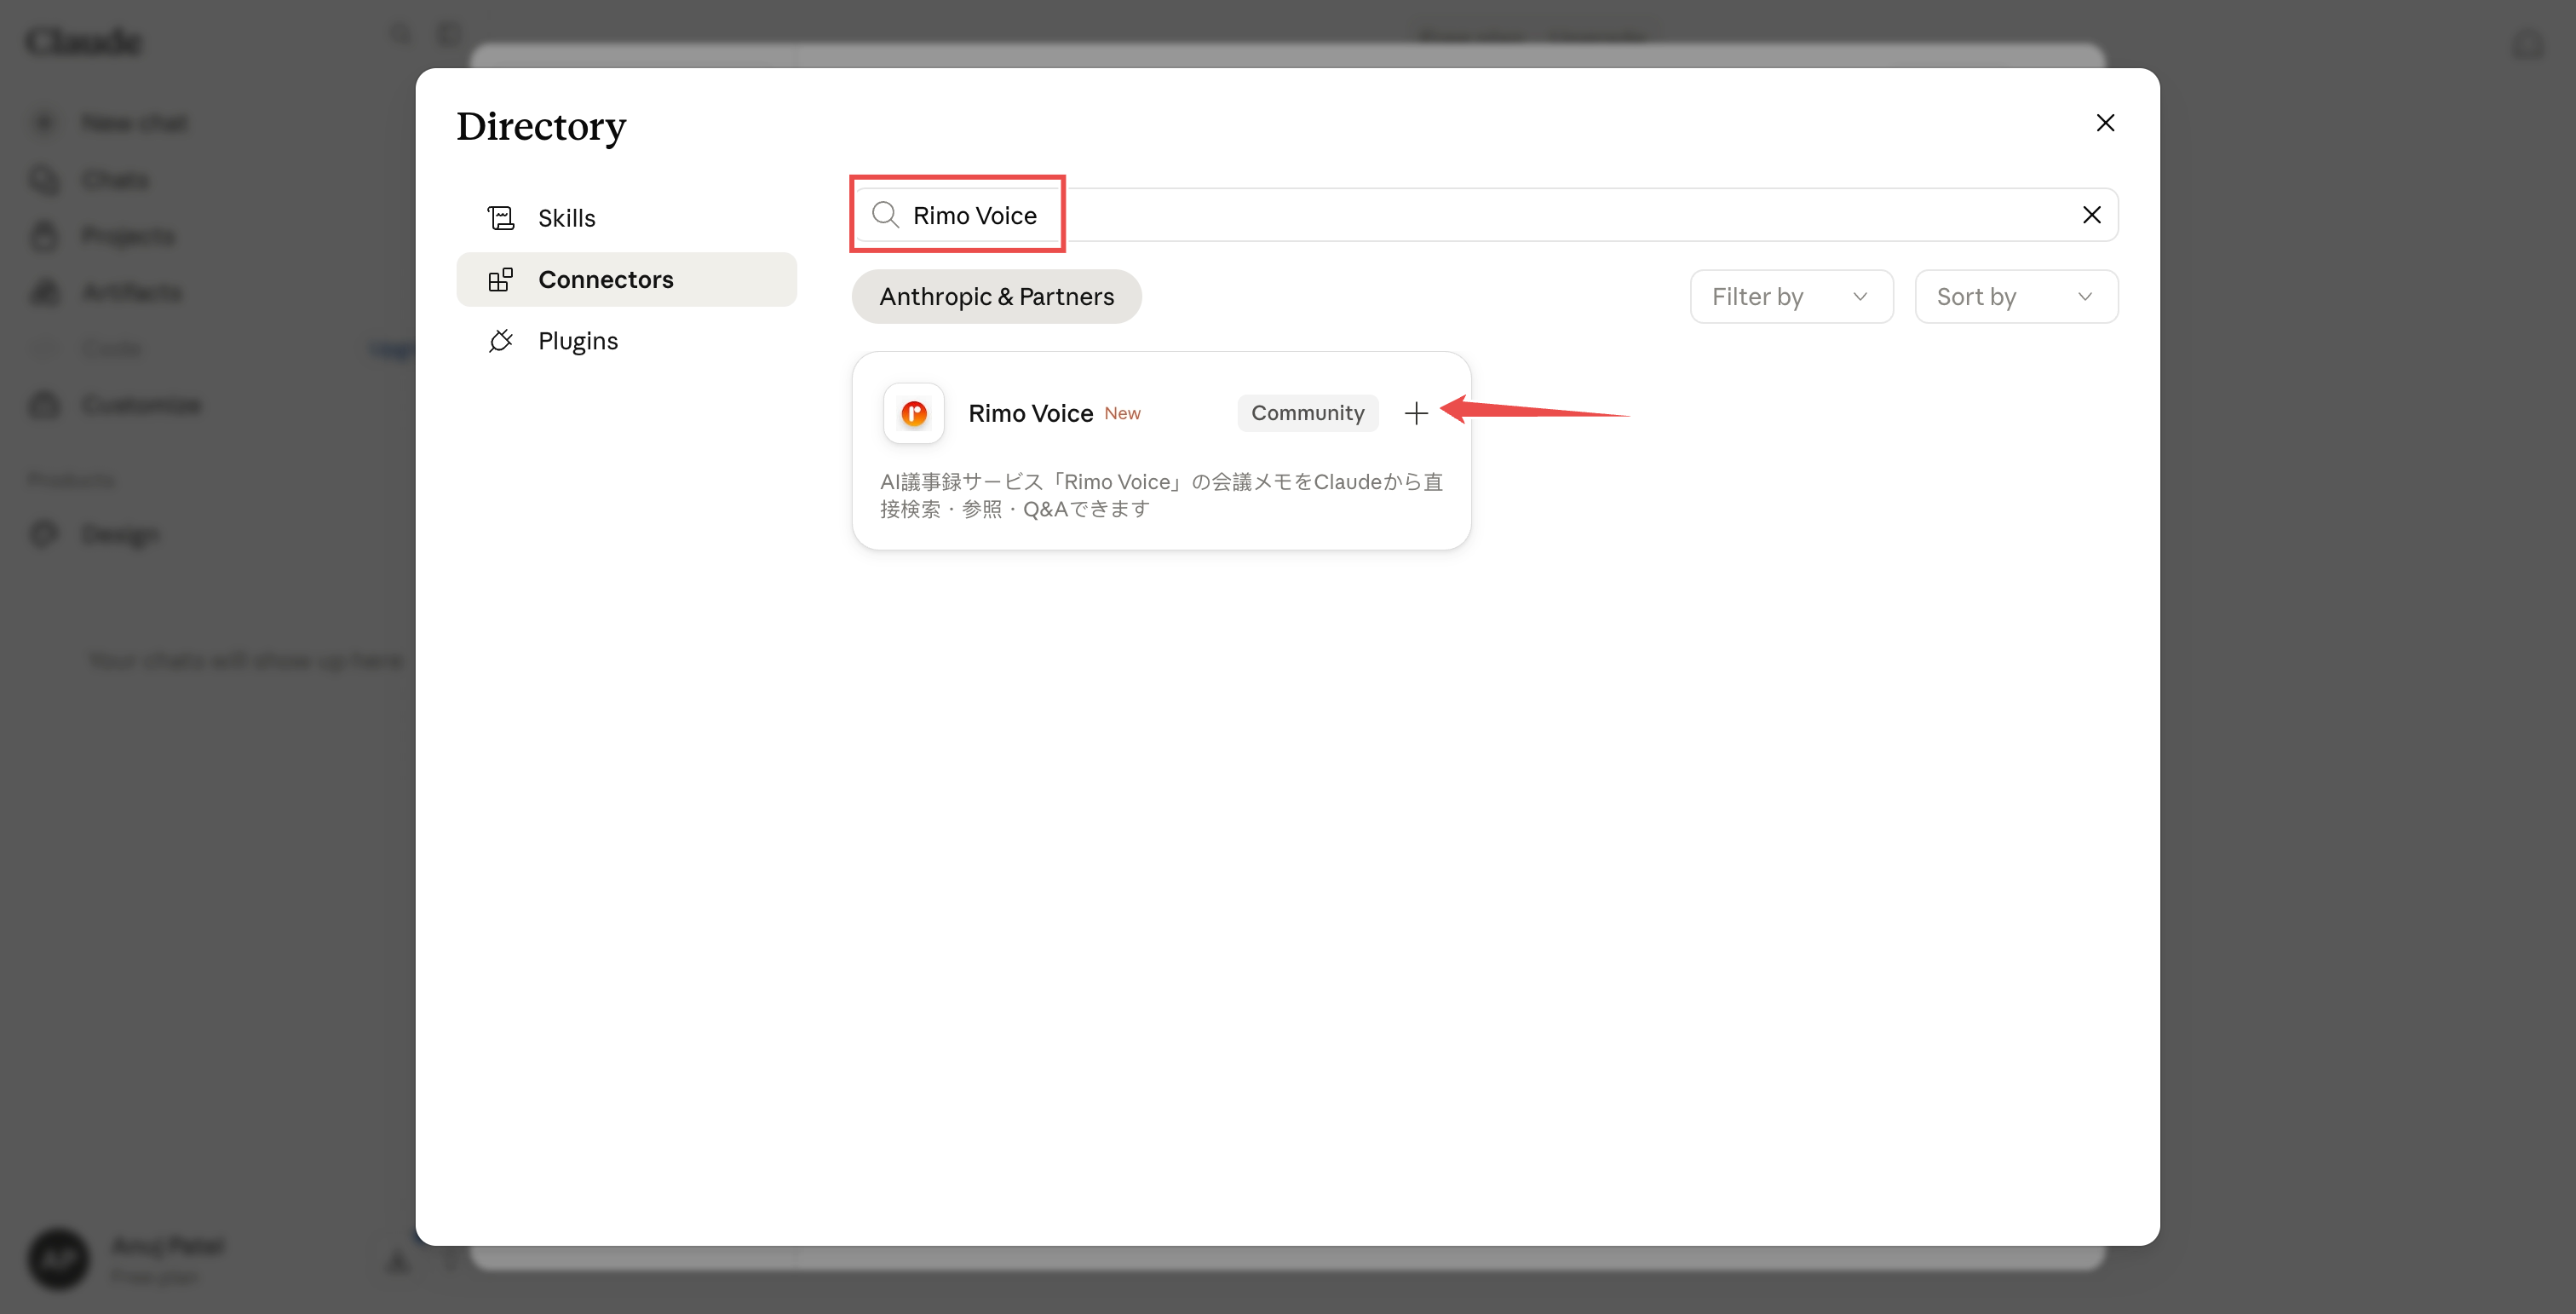
Search for Rimo Voice and open the result.
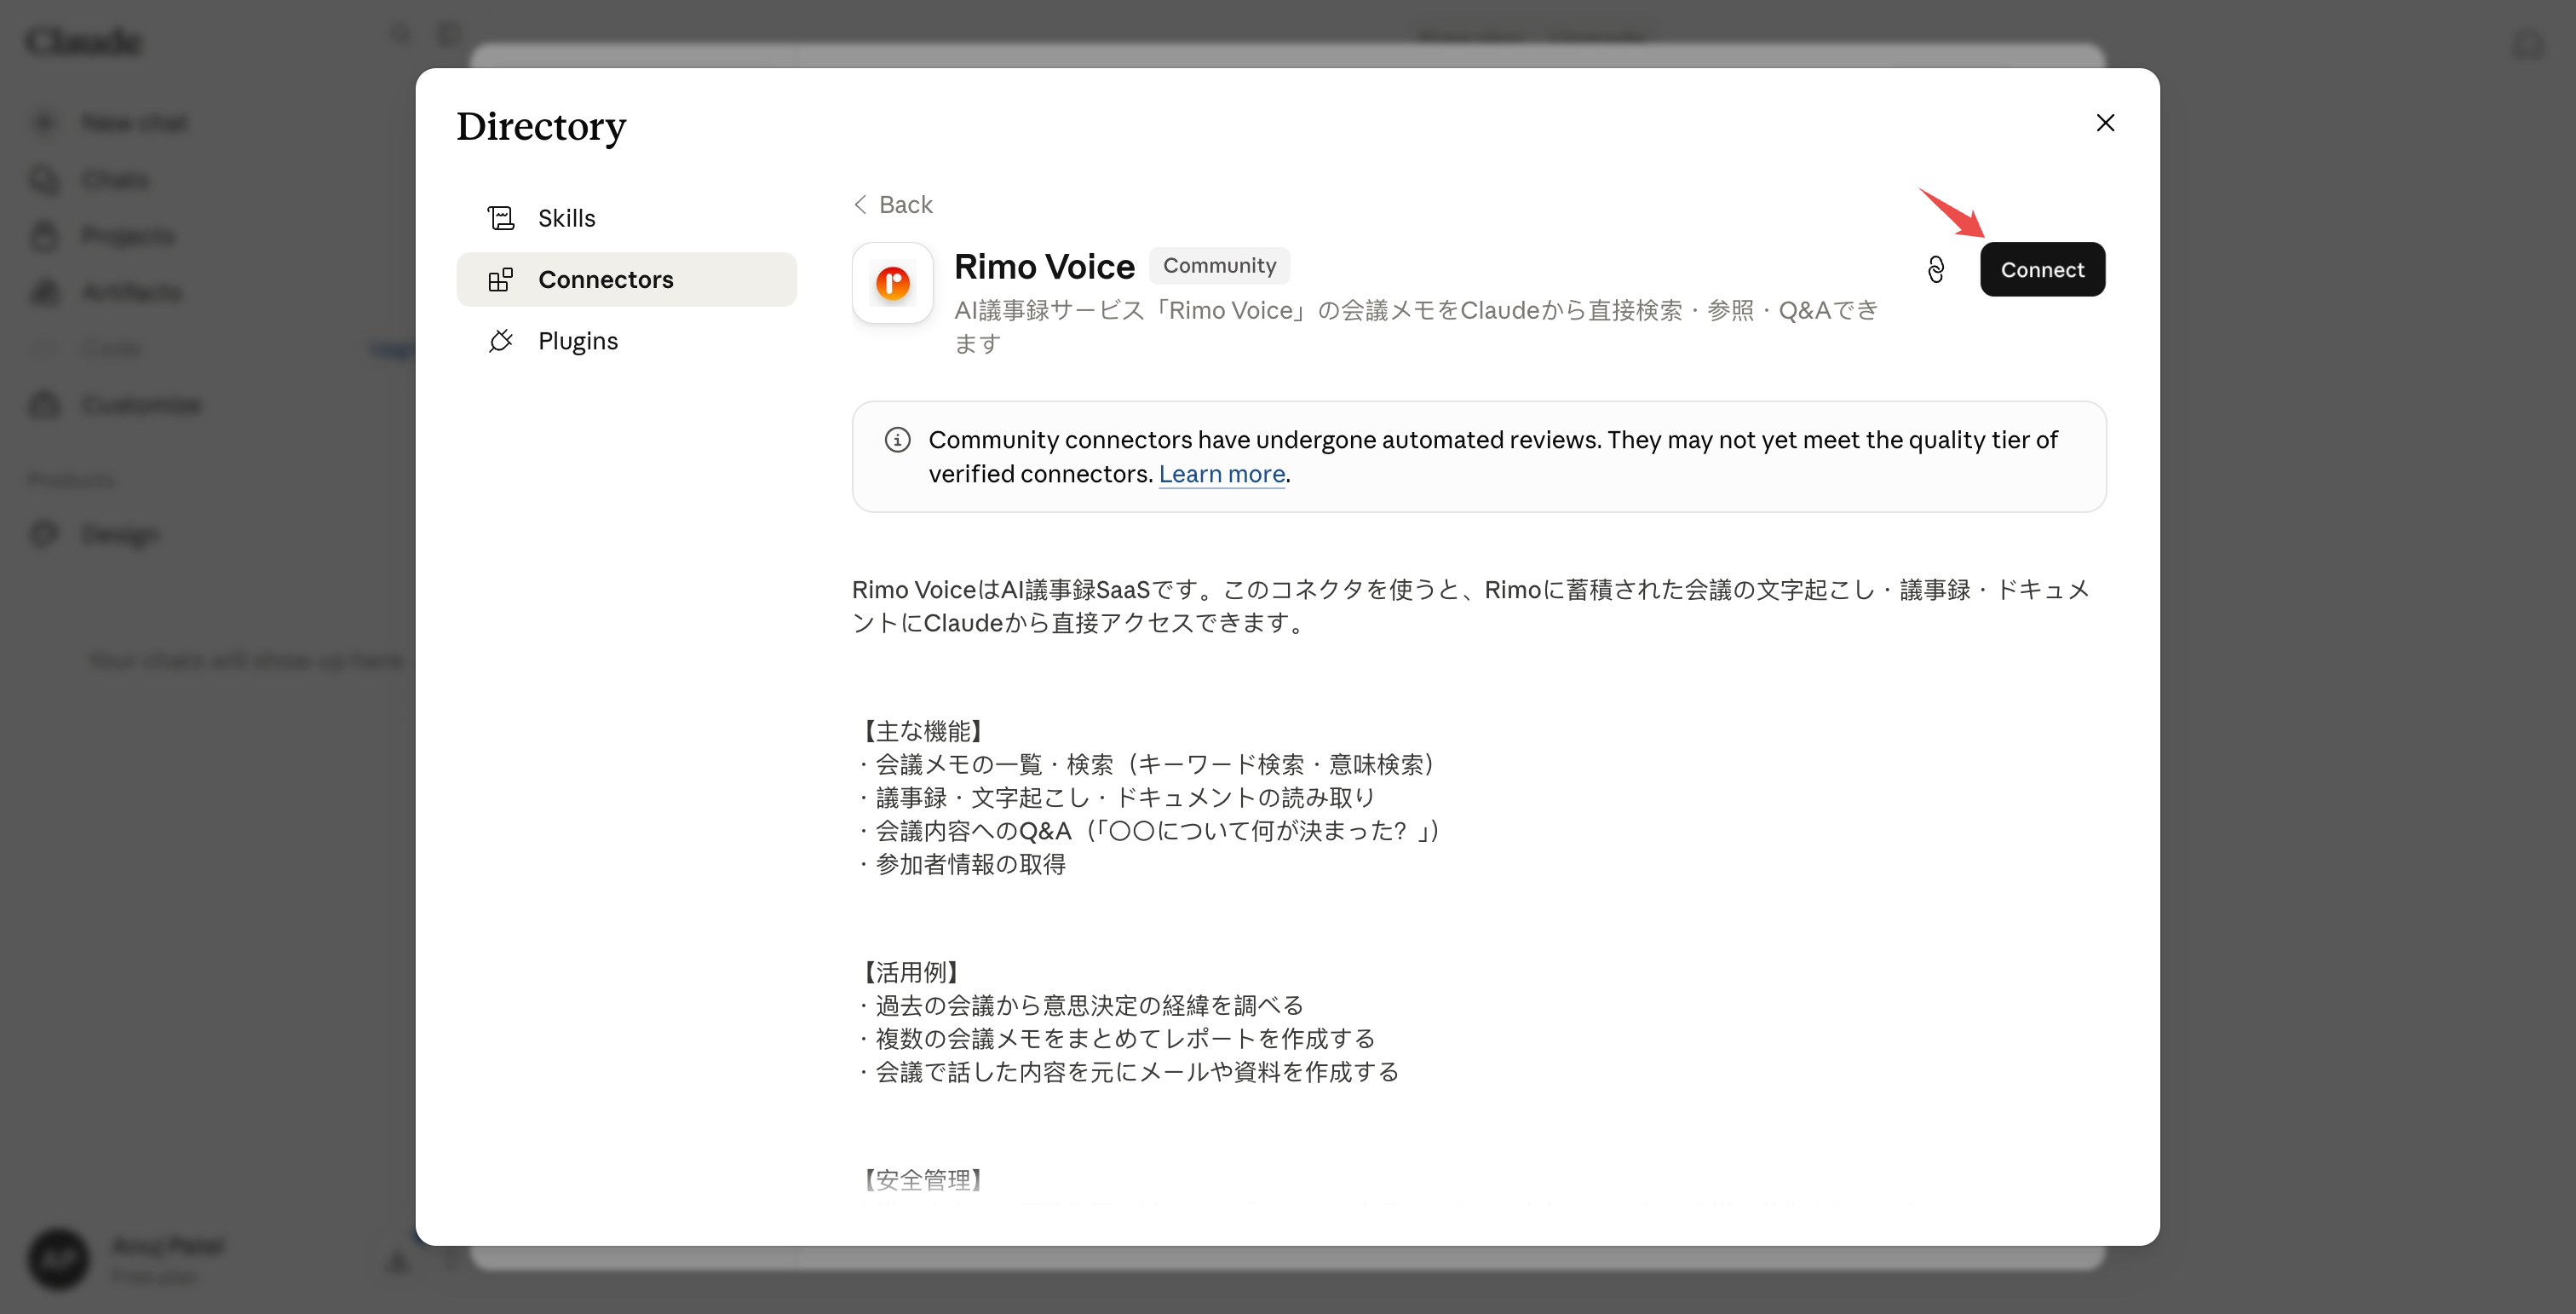
Click Connect.
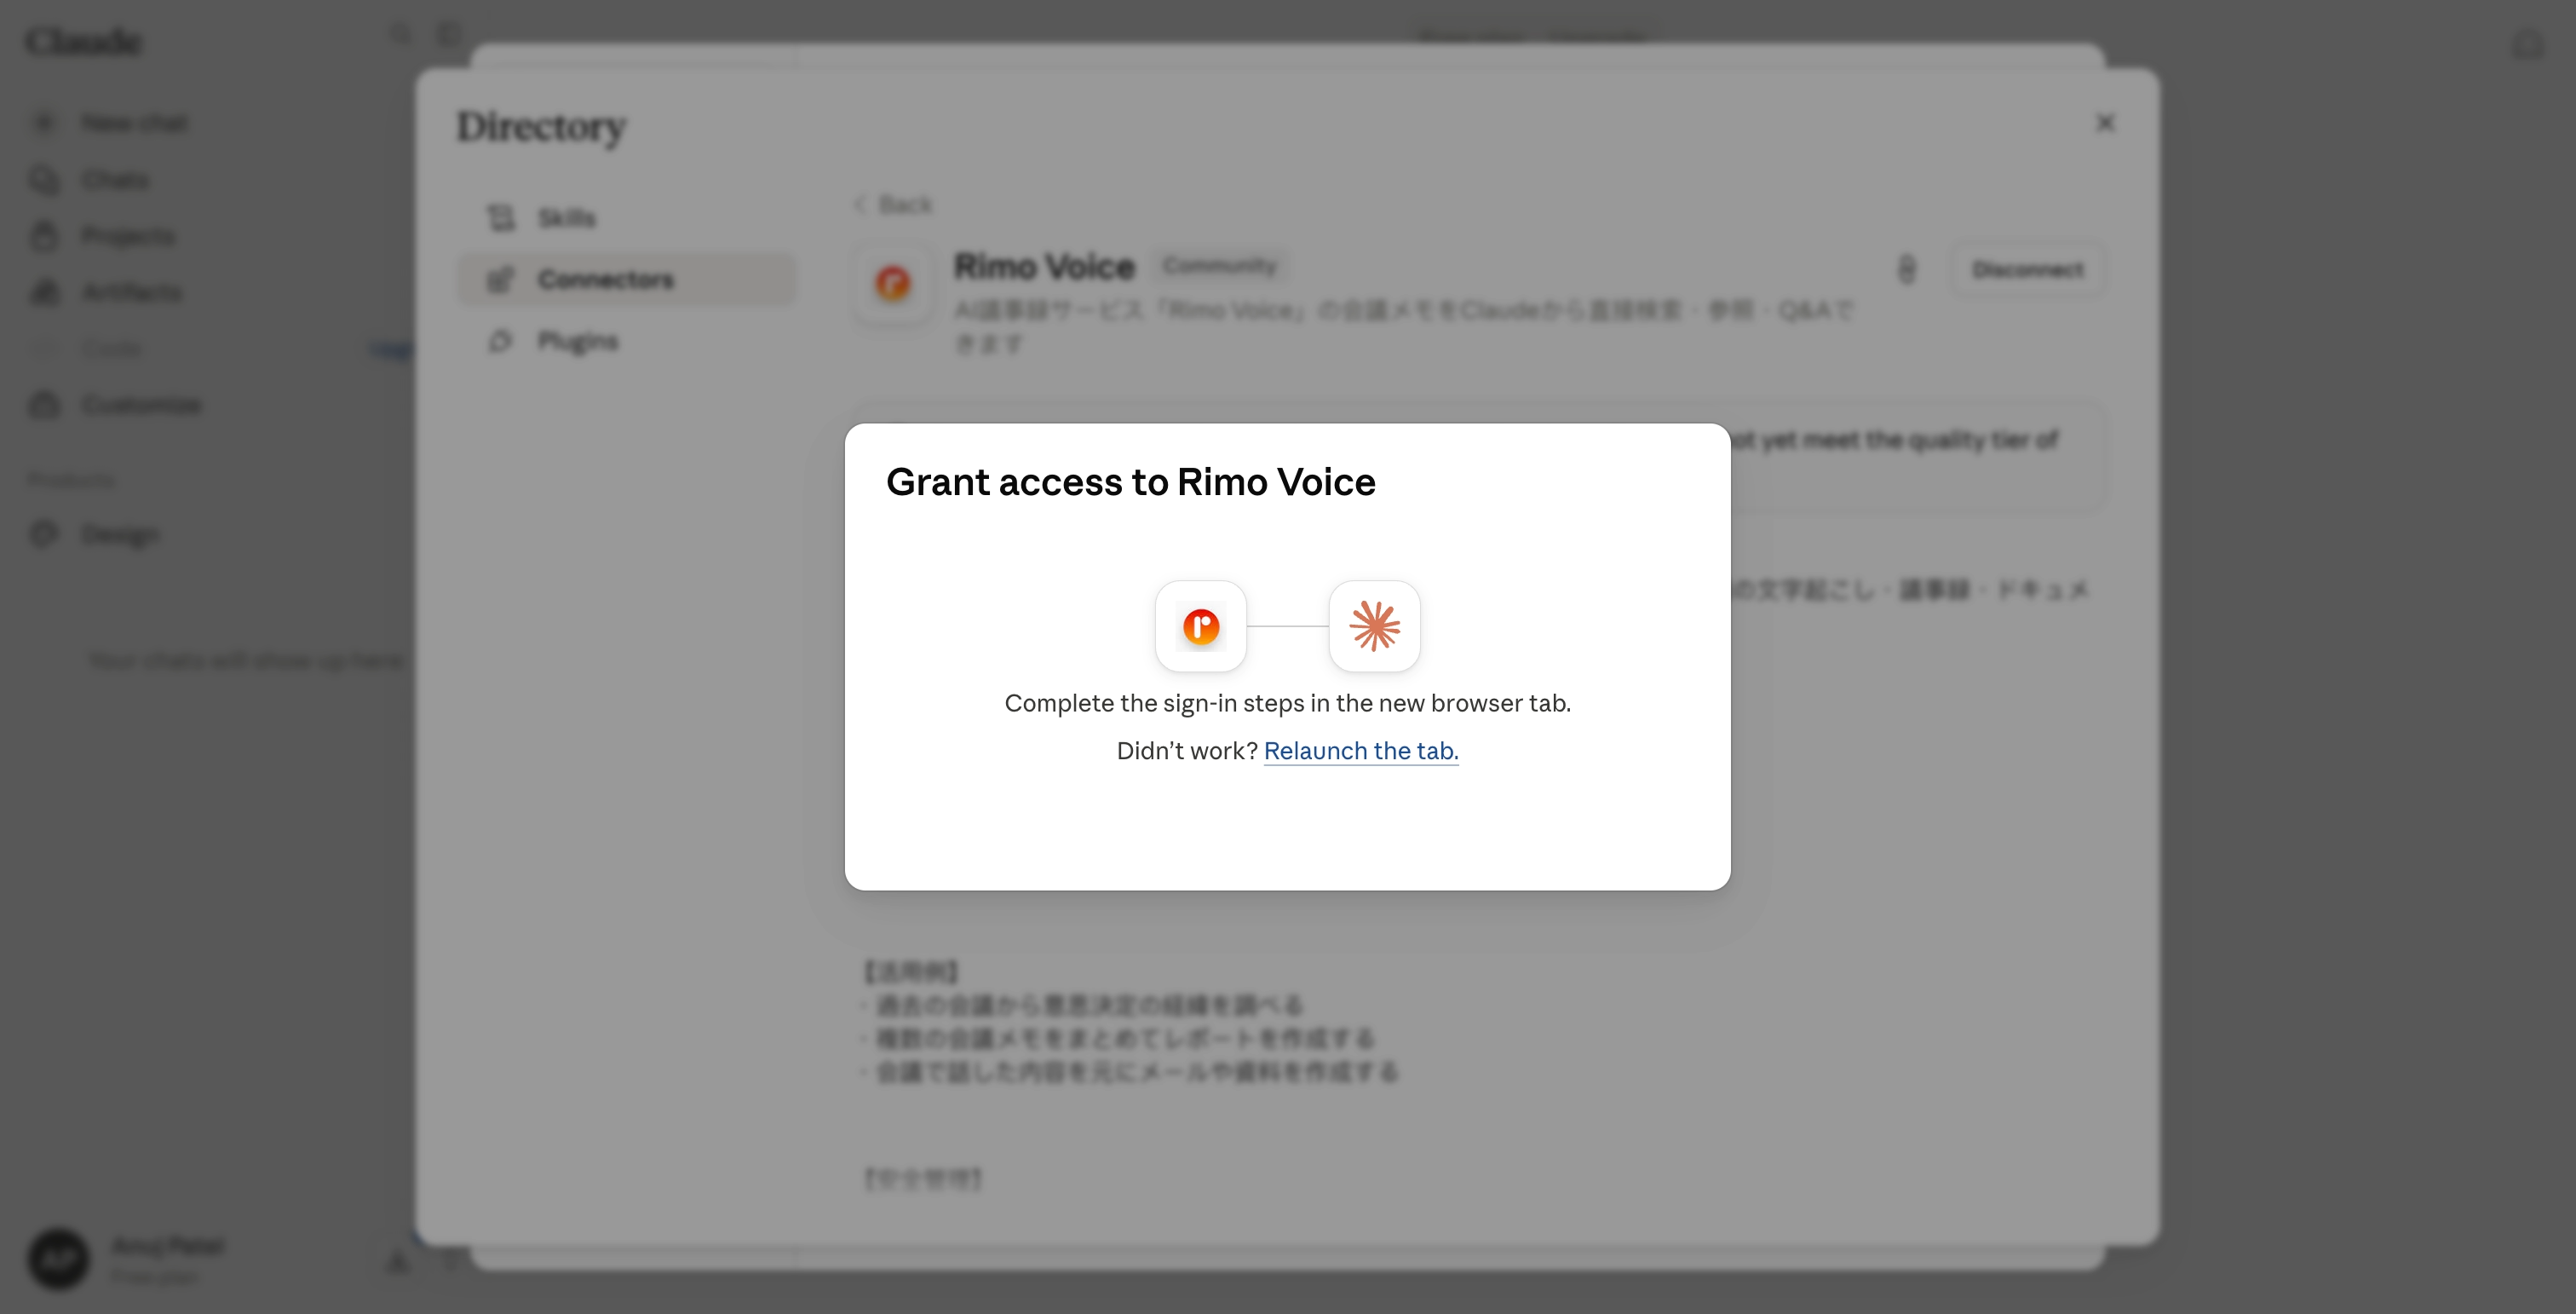
A new browser tab opens on Rimo's own sign-in page — see Sign in to Rimo. Claude waits on a Grant access to Rimo Voice dialog until you finish there.
If you're on Claude's Team or Enterprise plan
Step 1 — an admin enables Rimo Voice for the organization (once)
Find Rimo Voice in the directory and enable it for the organization.
If that page isn't available to you, ask whoever manages your Claude workspace — enabling connectors for an organization needs admin permission (see Claude's guide).
Step 2 — each member connects (once per member)
Open Customize → Connectors.
Find the Rimo Voice connector in the list and click Connect.
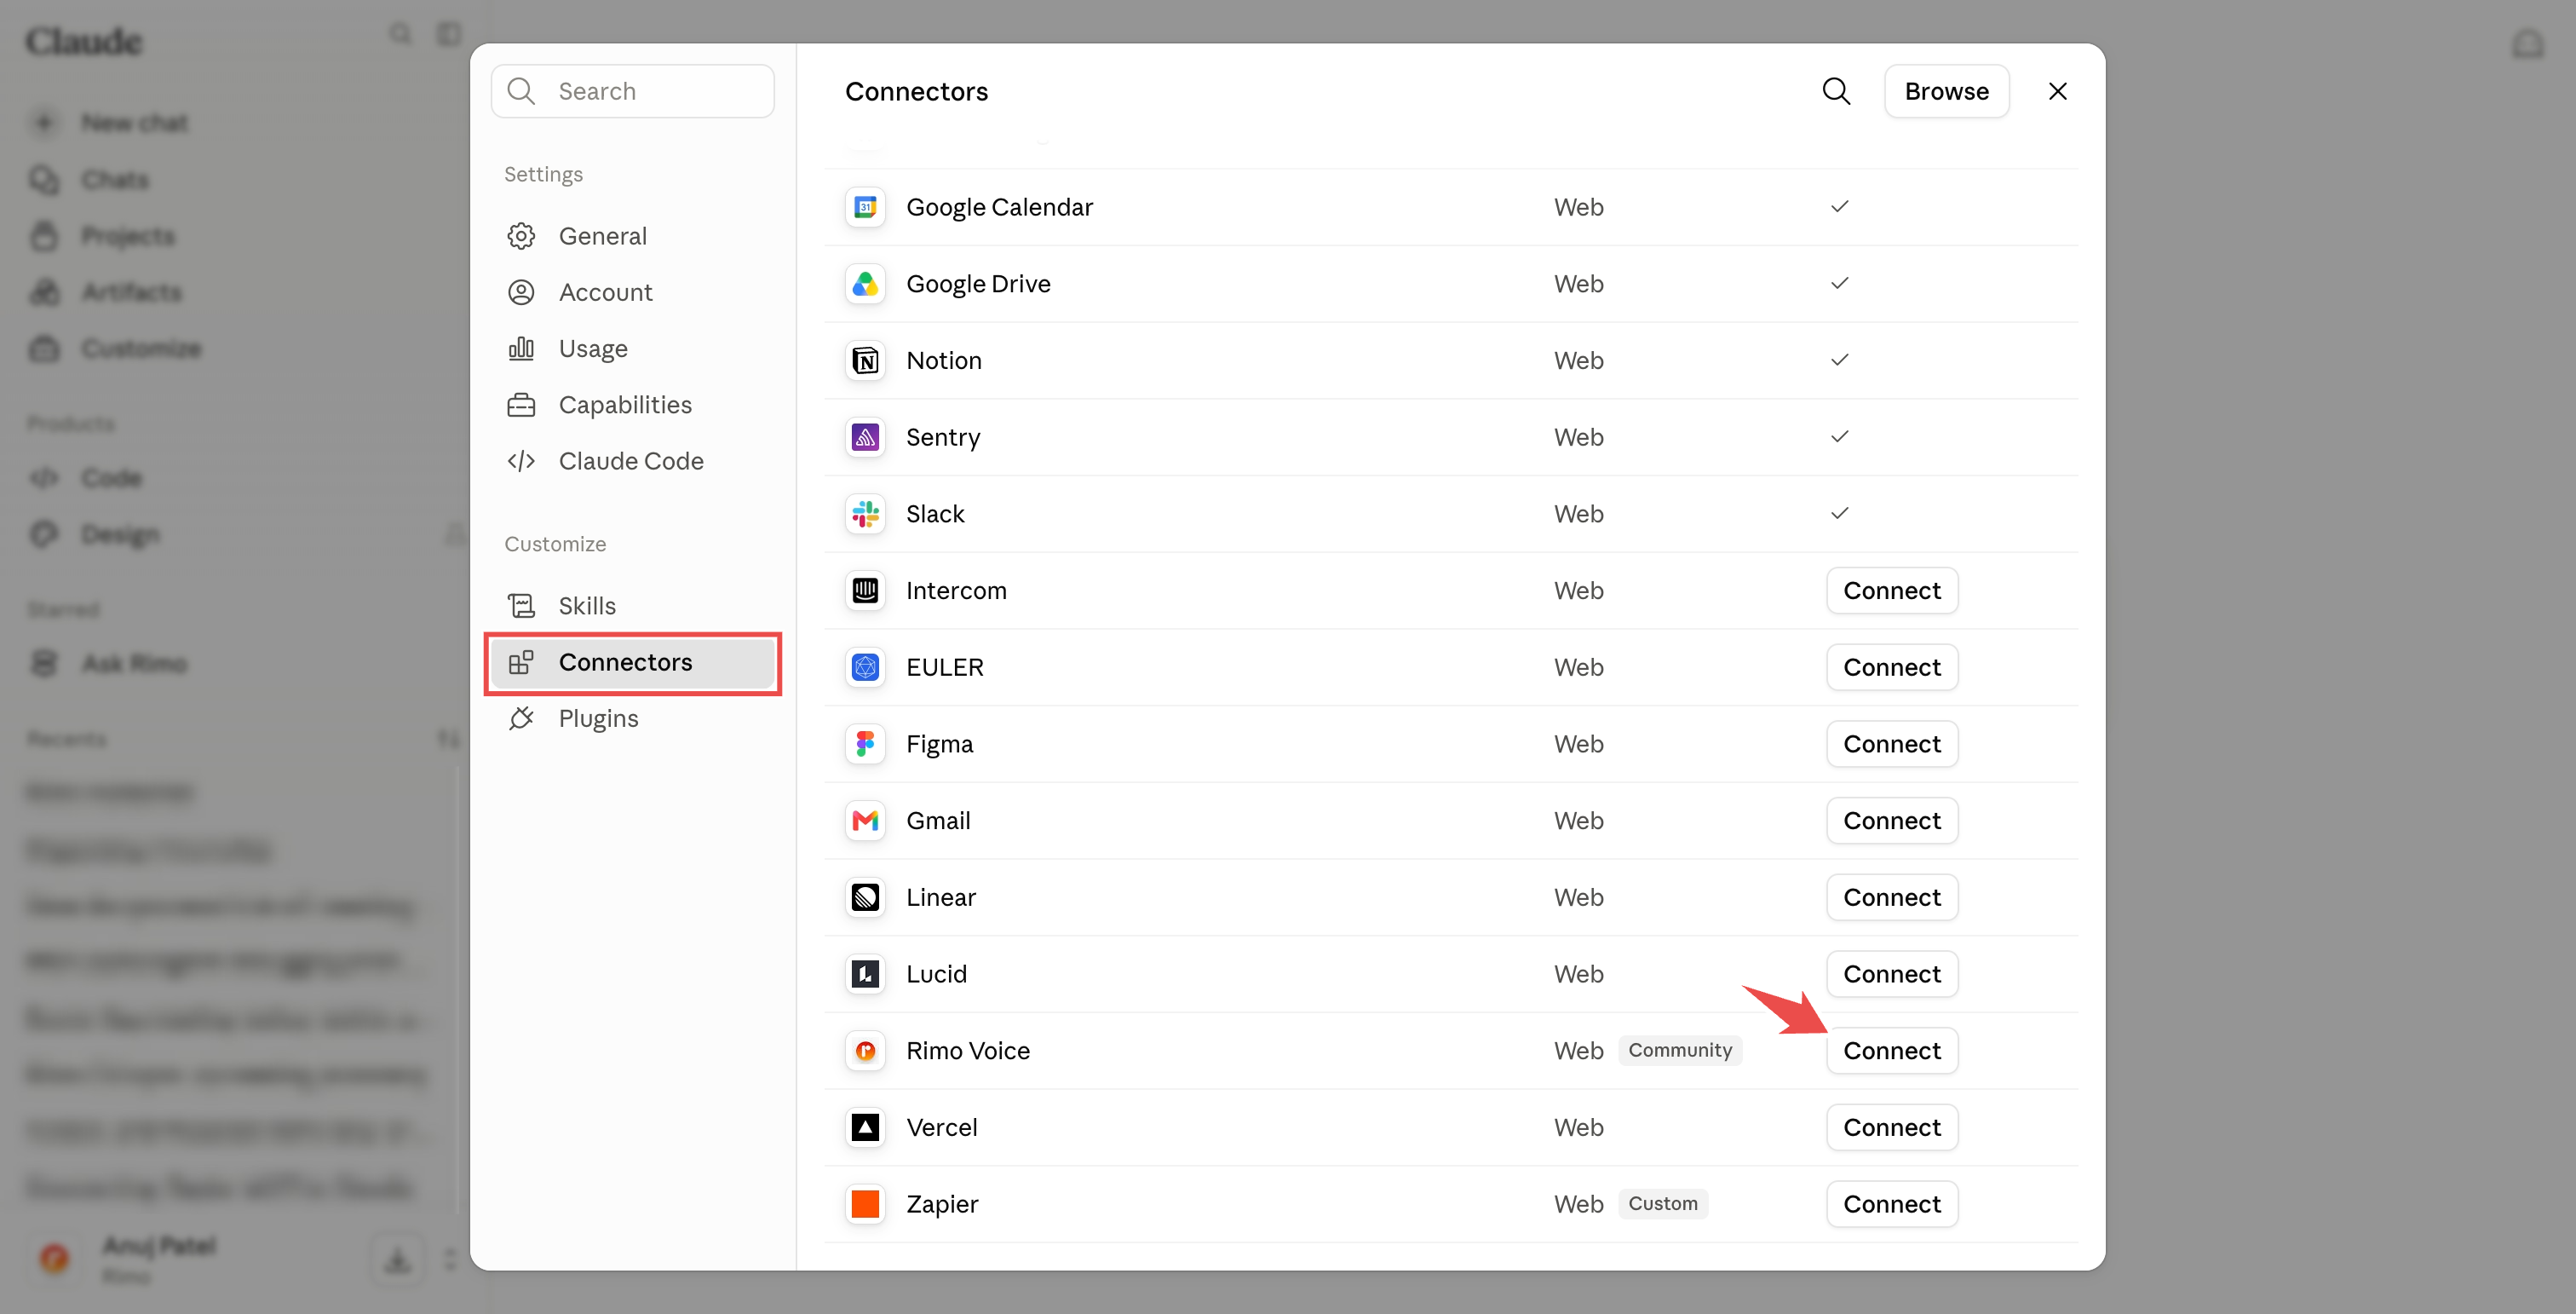
A browser tab opens — see Sign in to Rimo.
On a Team plan without permission to enable connectors? The directory shows Request instead of a connect action. Click it and your organization's admins get the request; the button reads Requested while it's pending, and Claude tells you the outcome the next time you open the directory.
Sign in to Rimo
When you connect Rimo Voice, Claude opens a browser tab on Rimo's own sign-in page:
Sign in to Rimo with your usual account.
Pick an organization. The screen shows that Claude is asking for access and asks which organization it may look at. The Approve button stays greyed out until you choose one.
Click Approve. (Deny cancels.)
You won't need to do this again unless you disconnect.
Turn it on in a chat
In any conversation, click the + button at the lower left of the chat box.
Choose Connectors and switch Rimo Voice on.
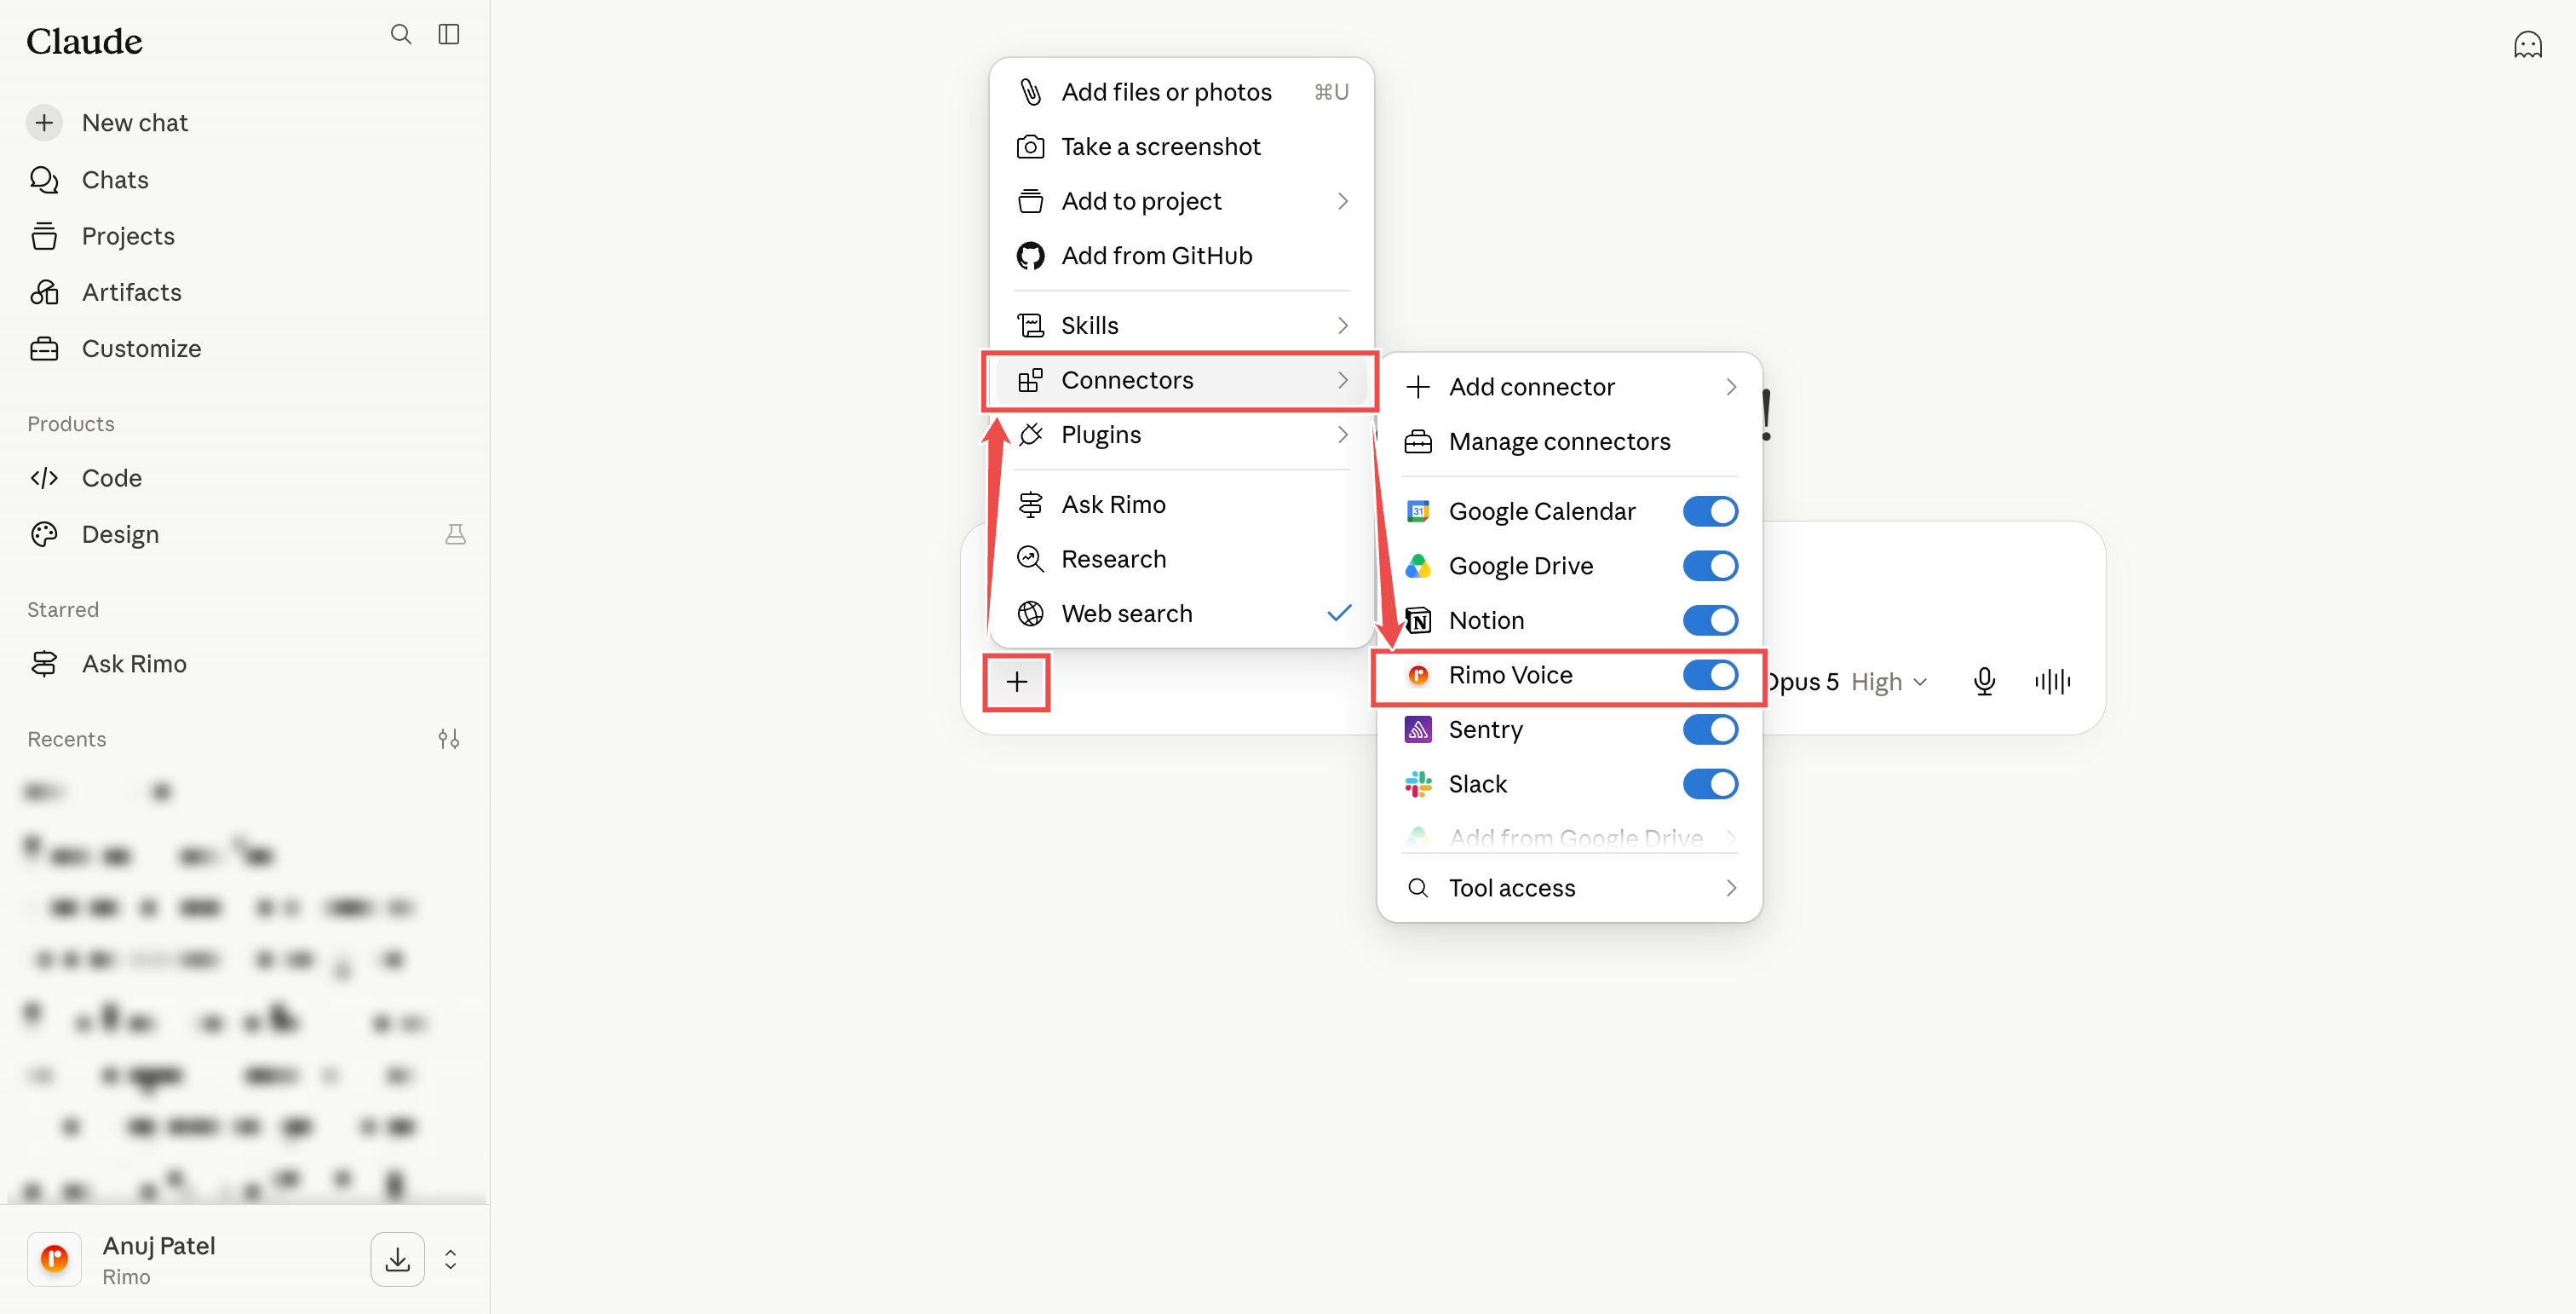
Ask away — e.g. "Search my Rimo notes for the pricing discussion and tell me what we decided."
Approve every tool at once
After you connect, Claude asks for your approval the first time it uses each tool. To approve them all in one go instead:
Open Customize → Connectors and click Rimo Voice.
Under Tool permissions, set the Read-only tools group to Always allow.
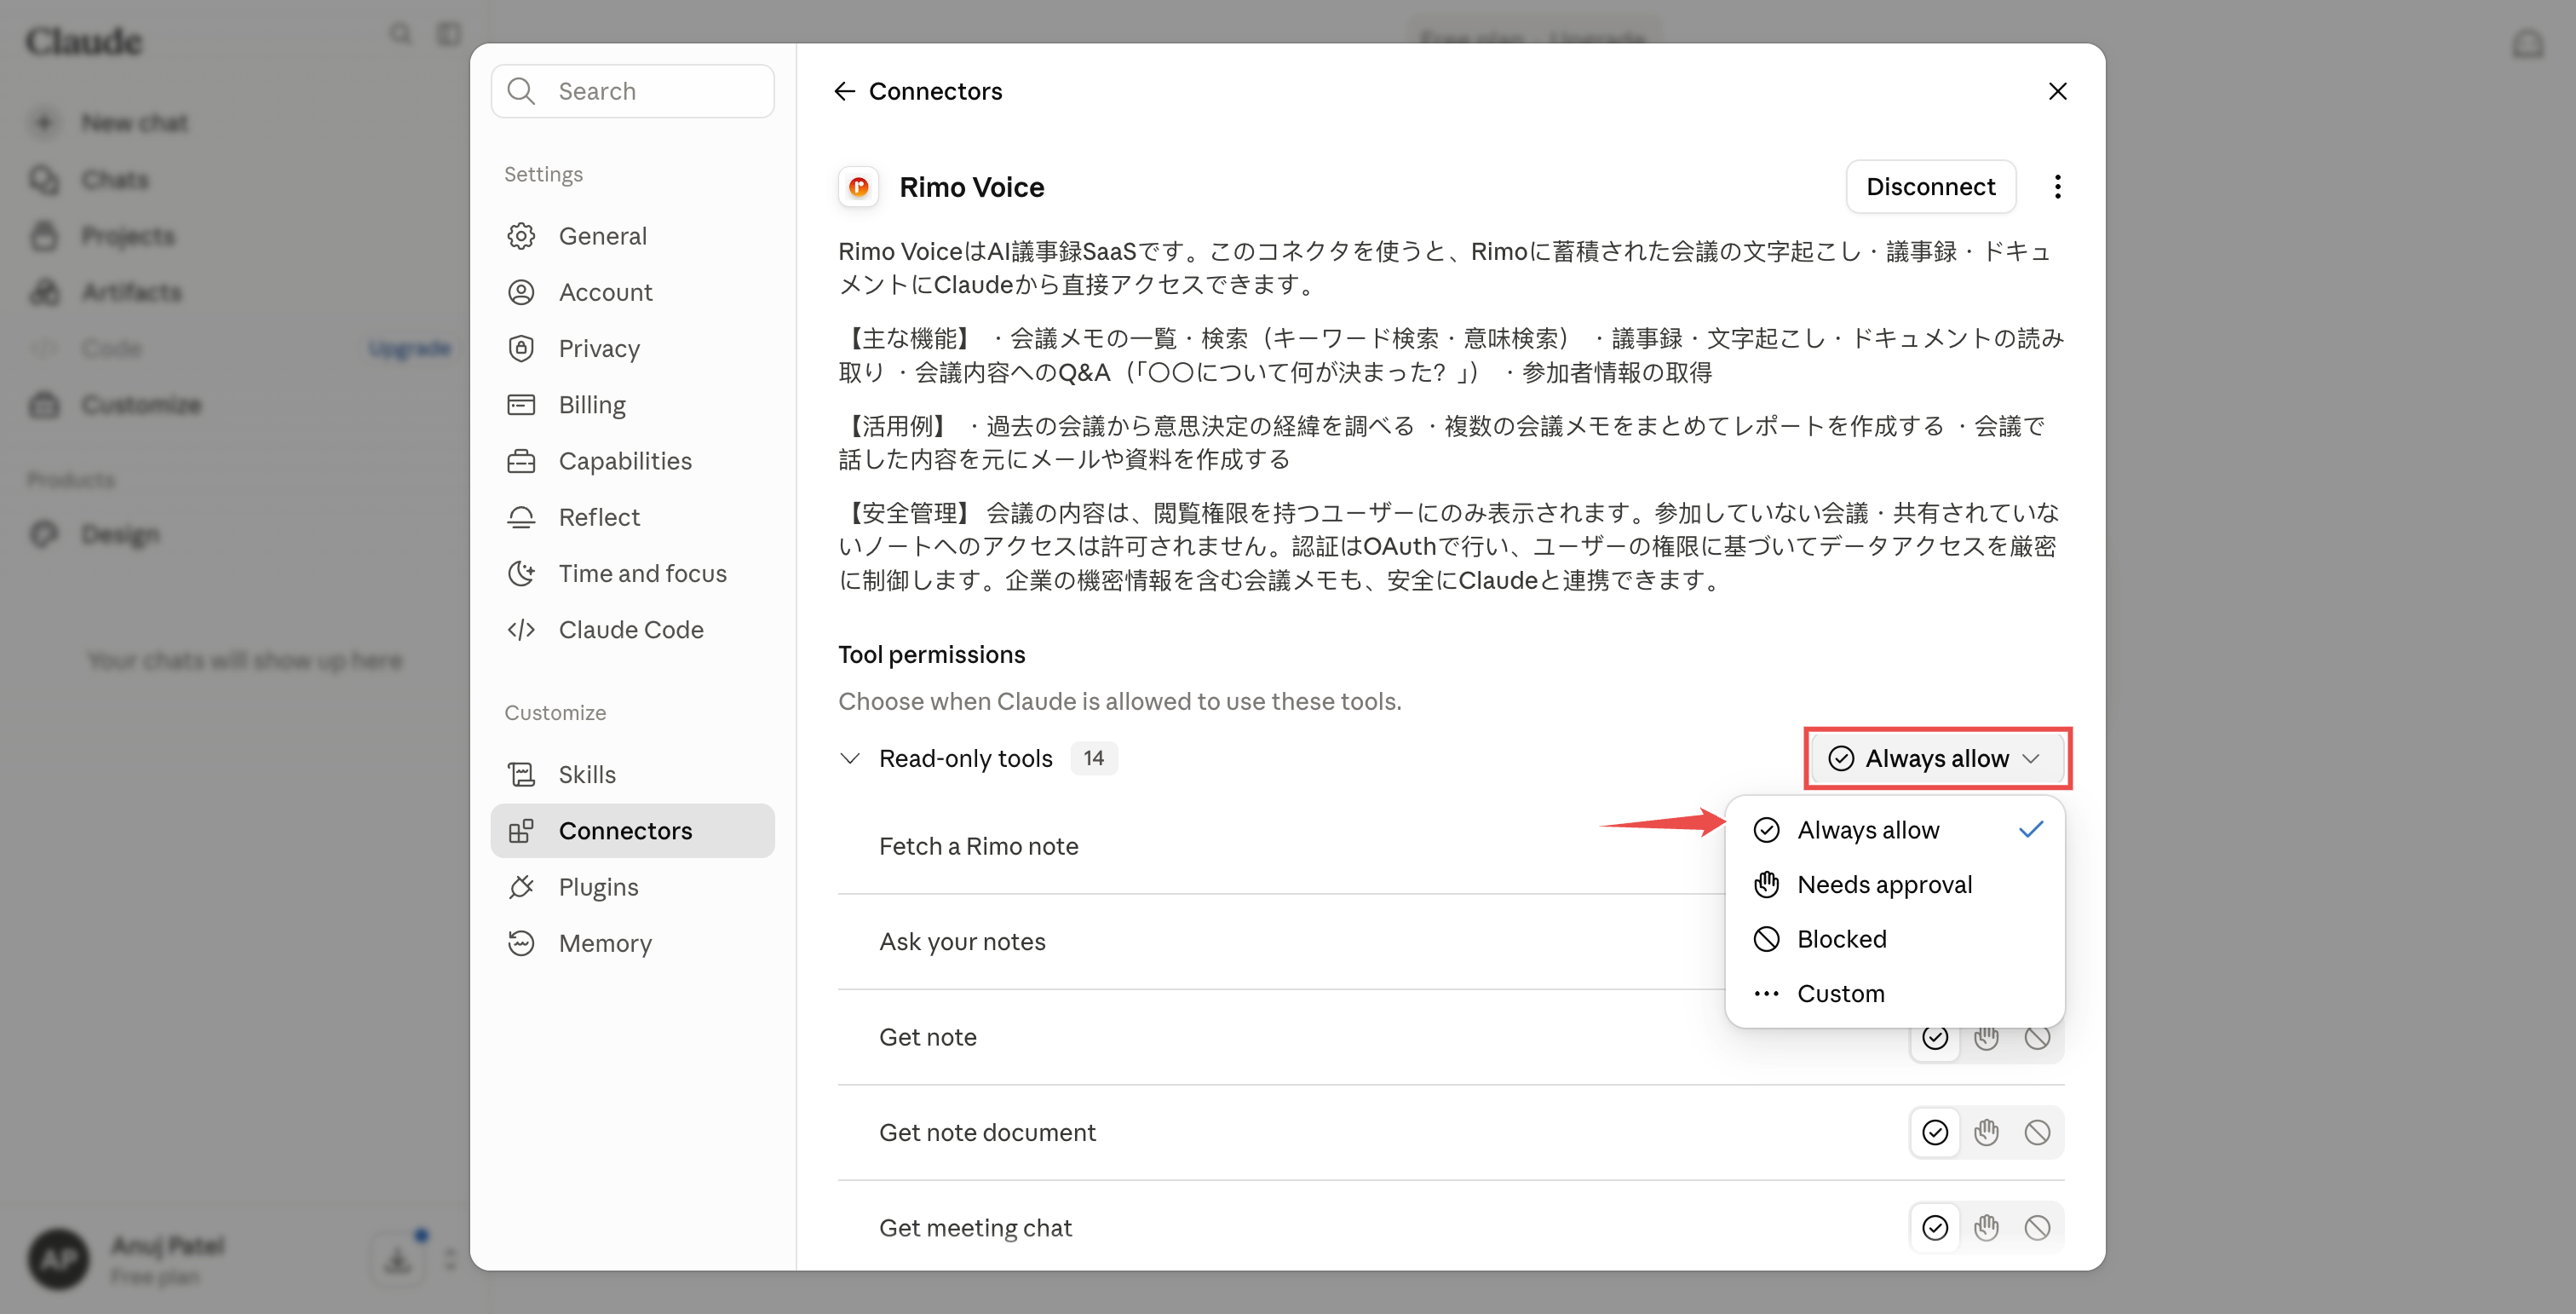
Every Rimo Voice tool is read-only — none of them change anything in Rimo. You can also set a single tool to Needs approval or Blocked from the same list.
Refresh the tool list
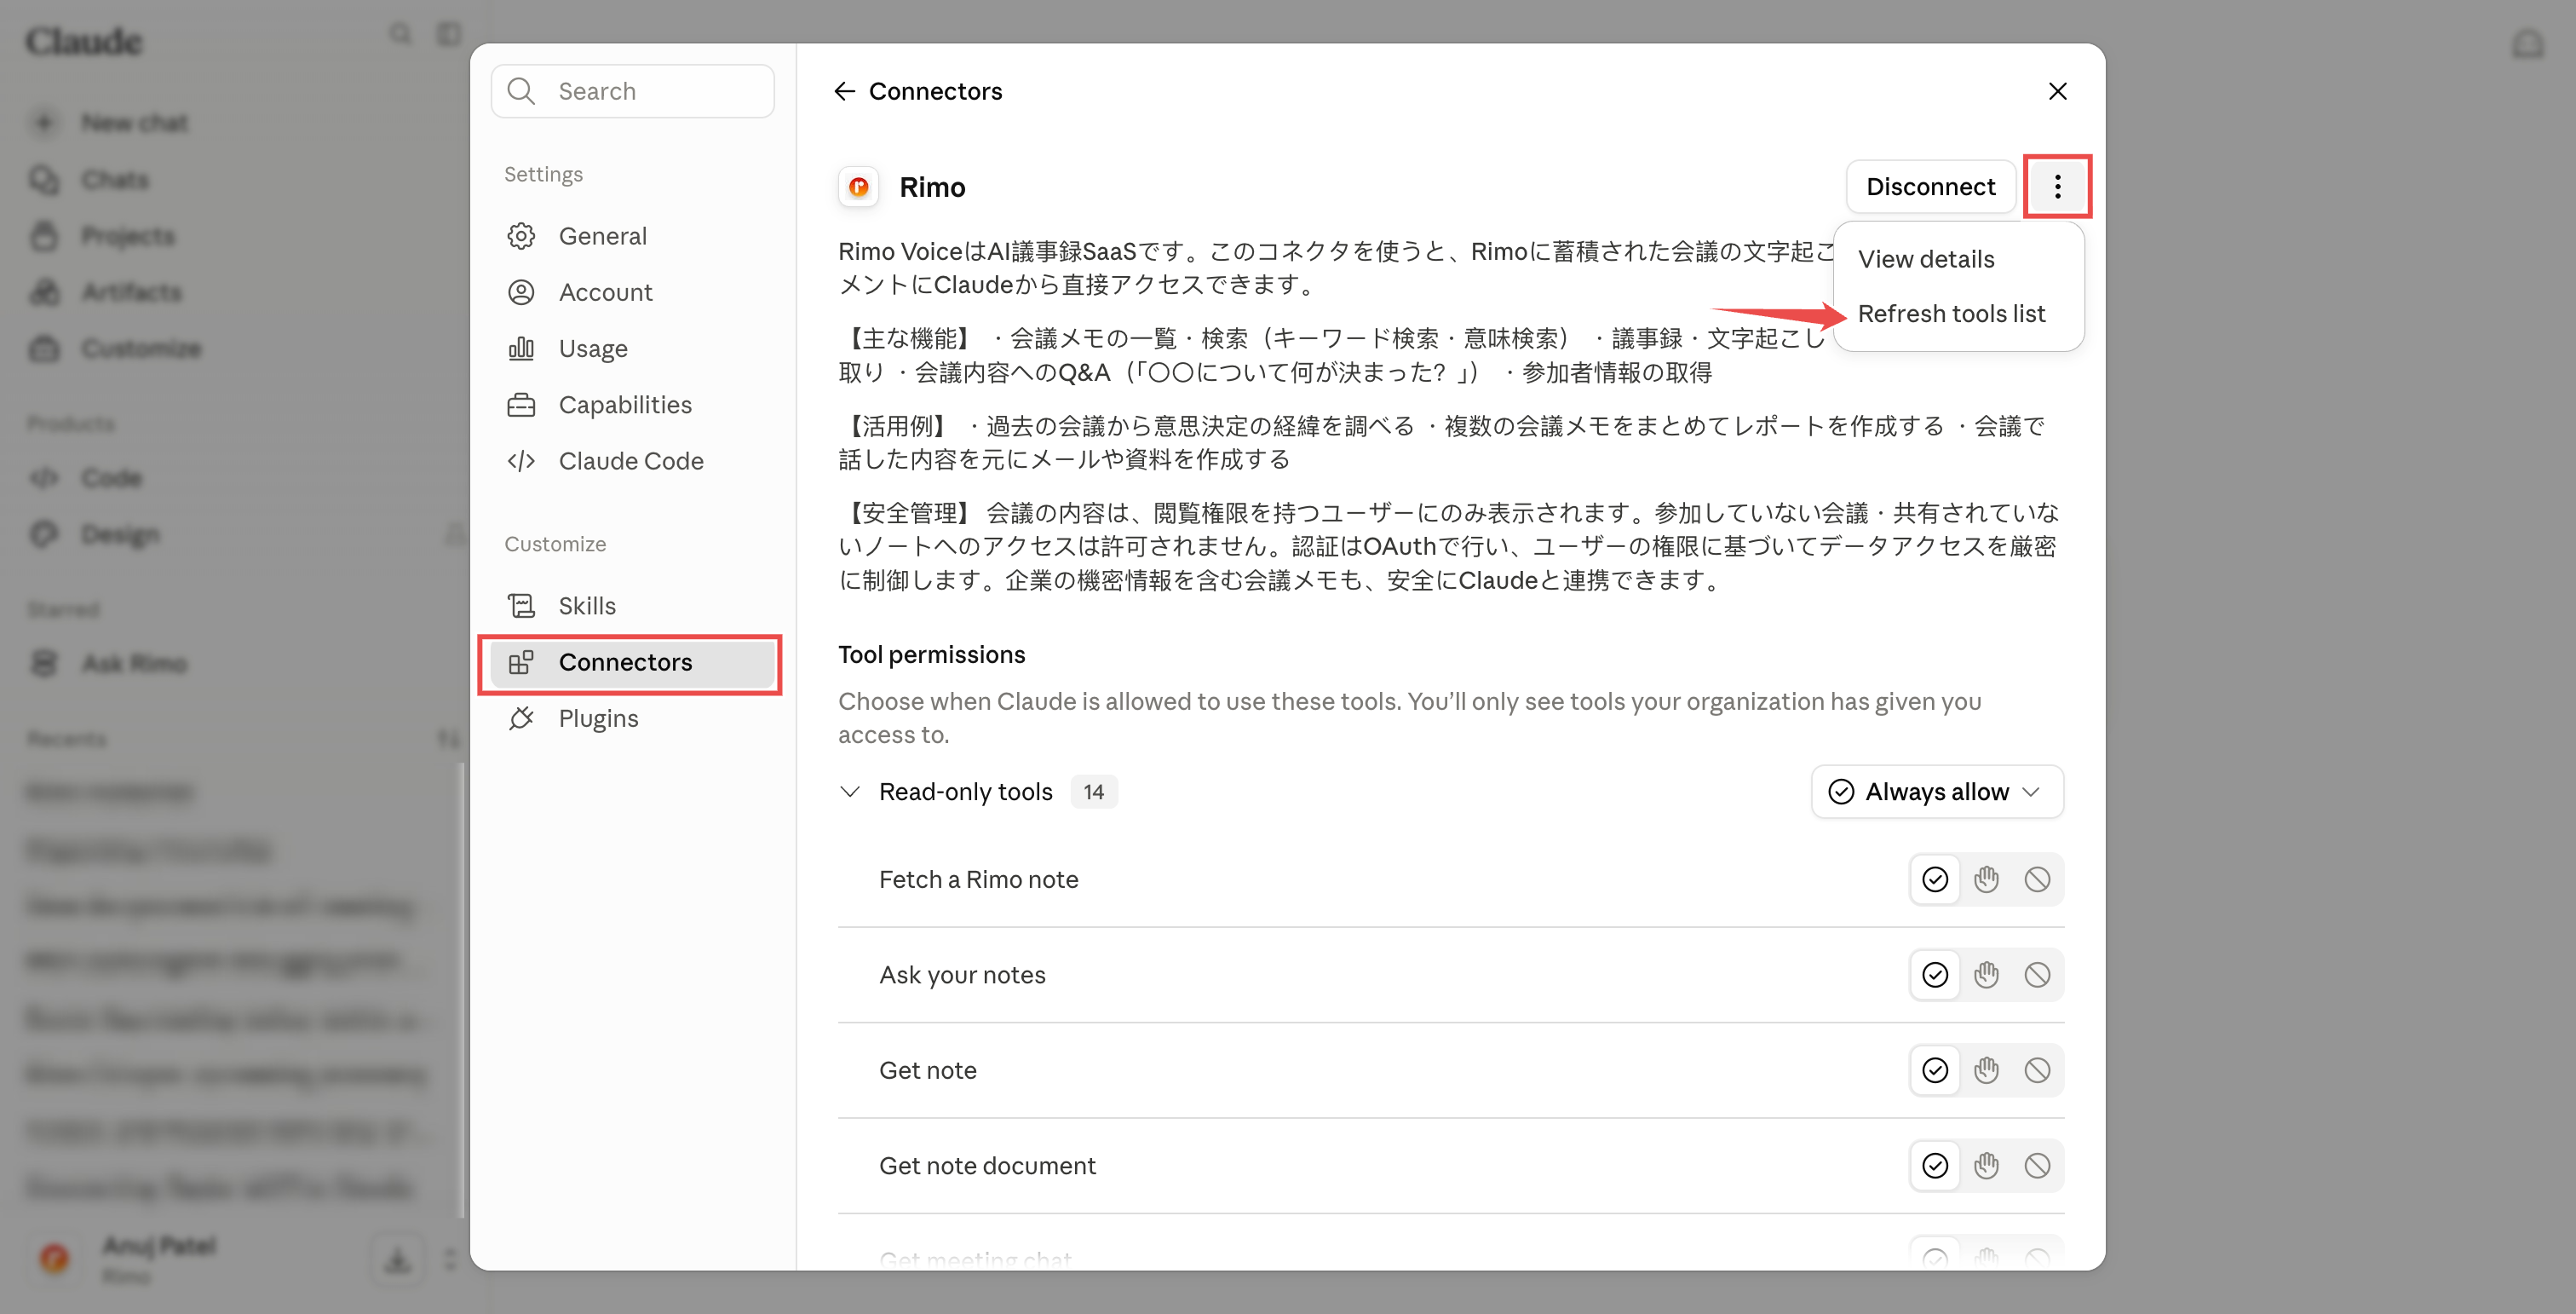
Rimo adds new tools from time to time. If Claude isn't showing the latest ones, refresh the list:
Open Customize → Connectors and click Rimo Voice.
Open the ⋯ menu (top right, next to Disconnect) and choose Refresh tools list.
Example things to ask
- "Show me my Rimo notes from this week."
- "Which Rimo meetings did I attend last sprint?"
- "Get the transcript of my last Rimo meeting."
- "Who was in that meeting?"
- "Find my Rimo notes about pricing strategy."
- "Find my notes about onboarding — even the ones that don't use that exact word."
- "Looking at my Rimo notes, what did we decide about the Q3 release?"
Rimo only ever shows Claude what you can see in Rimo.
Switching organizations & turning it off
- One organization at a time. A connection looks at the single organization you picked when you signed in. To use a different one, disconnect and connect again, choosing the other organization.
- Turn it off any time. Open Customize → Connectors, click Rimo Voice, and click Disconnect.
If something doesn't work
You can't find Rimo Voice in the directory. Search for Rimo Voice, not just Rimo, and make sure you're on the Connectors tab of the directory rather than Skills or Plugins. You can also open the listing directly at claude.ai/directory/connectors/rimo-voice. On Team / Enterprise, an admin has to enable it for the organization first — if you see Request, click it to ask them.
Sign-in works but "Approve" stays greyed out. Pick an organization on the sign-in screen first — then Approve becomes clickable.
Claude can't find a note you know exists. It only sees what your own account can see, in the one organization you connected. If the note is in a different organization, reconnect and pick that one. A note a colleague never shared with you won't show up.
Official Claude help
See also
- Rimo in ChatGPT — the same thing for ChatGPT
- Rimo in Gemini — the same thing for Gemini Spark
- Rimo in Microsoft Copilot — connect through a Copilot Studio agent using DCR
- Authentication — how Rimo sign-in and accounts work